I know as a new teacher I like to see how other teachers grade and break down their grades, so I thought I would share what is currently working for me.
Grading Policy:
40% Tests
20% Quizzes
20% Classwork/Notebook
20% Homework\
Tests
I grade tests using Standards Based Grading, read about it here. I'm loving it for many reasons, but one I haven't mentioned yet is that I'm much less likely to put off grading. I don't know about you, but I spend a ridiculous amount of time deliberating over how many points to count off for this and SBG has really helped that.
Policies: Students can study and prove they have practiced using my resource website and then I will give them new problems. I am still working on the mechanics of this and would love suggestions on what you do!
Quizzes
Every regular schedule day with no tests we do a daily quiz. I get all my quizzes from Math-Aids. This makes it fast for me and I can also link to the quizzes for my students to practice at home since the problems are randomly generated and they provide answer keys. This is when I can focus on remedial skills like operations with fractions, changing percents to decimals, and operations with decimals that are assumed to be known by our kids but are often forgotten. They are usually 10 questions, 10 points each out of a 100. Sometimes I'll do half credit, but usually it is all or nothing.
These, like test, can be studied and retested. I also will requiz as a class certain quizzes that everyone did poorly.
Once I am in the second half of the course, these quizzes will shift to being review from the previous quarter.
Classwork/Notebook
I have a place on the back of their TOC to record classwork. It is my first time trying this and I am still ironing out the kinks. The last two units I have ended up going around and stamping the classwork the day before a test. I would really like to be more consistent in doing it every day.
Notebooks I am grading at unit tests using a quick rubric of 1 to 4 on 5 items:
- TOC is updated
- Page numbers present
- Pages are titled
- Homework has been corrected
- Everything is attached
I only spend a couple minutes on each notebook. I am already seeing a big change with only the second notebook check with students keeping up with it. My goal is for this to become and awesome resource for them, and I know for some of them it just isn't going to happen unless there is a grade attached. My principal says we "incent what we value". So I am incentivizing keeping the notebook in order.
So far I only have a couple students who aren't keeping up with it well. And now the others are pretty much on autopilot and that can just be a nice grade to help their classwork average.
Homework
I've decided to not accept any late homework this semester and it is making things so much easier. I wrote a post about my homework process here.
I'm also trying to incorporate one project per unit this year. Projects will be worth two homework grades. Mostly they are going to be on matching multiple representations of the functions we are studying, since that is a huge emphasis in CCSS.
Do you have any grading policies or tips that have really paid off? Share in the comments!
Saturday, February 22, 2014
Standards Based Grading - Mechanics
In this post I'd like to show you how I am currently assessing using SBG and then how I'm having the students record it.
Scores
I'm using a scale from 5 to 10 to record, since I feel like those scores translate in a gradebook to the typical letter grade I think each level deserves. I do use half points if I feel like they are squarely between two levels.
To me:
10 - Perfect performance
9 - Making minor errors either in mechanics or notation
8 - Making a significant mistake repeatedly that shows a gap in knowledge
7 - Making progress, but has many gaps
6- At least knows how to start a problem
5 - Blank or unrelated answers
What I really like about scoring this way is that my lower students can see that they are making progress in some areas, instead of just marking things wrong or doing partial credit - I can summarize what their main errors are and work with them to fix it. But, I also love what it does for my higher students. I teach 9th graders and a lot of them are used to coasting in middle school and always getting A's on tests because they were at the top of the curve and got extra credit. However, this method of grading forces them to see where they need to improve (and that these areas do exist - they aren't perfect!). And, many of them are committed to getting the higher score they are used to - so I think this challenges and helps all levels of students.
Test Structure and Grade Reporting
Usually my tests have around 5 objectives I am assessing. At the top of the test I have a place to record all of the scores for each section. I also indicate the score for the section at the top of the page with the respective problems


This is my first semester doing the whole course's tests with SBG so I am definitely still in the experimenting stage!
Scores
I'm using a scale from 5 to 10 to record, since I feel like those scores translate in a gradebook to the typical letter grade I think each level deserves. I do use half points if I feel like they are squarely between two levels.
To me:
10 - Perfect performance
9 - Making minor errors either in mechanics or notation
8 - Making a significant mistake repeatedly that shows a gap in knowledge
7 - Making progress, but has many gaps
6- At least knows how to start a problem
5 - Blank or unrelated answers
What I really like about scoring this way is that my lower students can see that they are making progress in some areas, instead of just marking things wrong or doing partial credit - I can summarize what their main errors are and work with them to fix it. But, I also love what it does for my higher students. I teach 9th graders and a lot of them are used to coasting in middle school and always getting A's on tests because they were at the top of the curve and got extra credit. However, this method of grading forces them to see where they need to improve (and that these areas do exist - they aren't perfect!). And, many of them are committed to getting the higher score they are used to - so I think this challenges and helps all levels of students.
Test Structure and Grade Reporting
Usually my tests have around 5 objectives I am assessing. At the top of the test I have a place to record all of the scores for each section. I also indicate the score for the section at the top of the page with the respective problems
Recording Scores in the INB
When I return the tests to students, I've created a recording sheet in excel. I have them color in red from a 5-7.5, yellow from 7.5-8.5 and green from 8.5-10.
Students then graph their results as a line. There is room for them to graph at least three assessments of each objective. I'm hoping this will be a tool for them to see how they are improving. I like the colors since it helps them know if they really need to kick it into gear or if they are doing ok both overall and for each objective.
Remediation
Check out my post on how I re-mediate students and provide them with targeted practice.
Wednesday, February 19, 2014
Color With Purpose (CWP)
If you've been looking into interactive notebooks (or been doing them) for any amount of time, you have probably come across the idea of "color with purpose" before. For the last year I had used this occasionally, but this semester I am really trying to use colors and highlighting whenever possible to try to show the connection between different things.
First, I borrowed the foldable I heard about from Math = Love, who got it from another blog.You can download a copy of the foldable here from In Stillness the Dancing. My tweak? Make it stoplight colors.
Red - They always need to ask the question
Yellow - If they answer yes they need to proceed with caution and follow the steps in the foldable
Green - Good to go on to the next step!


Today I thought I would share a couple lessons where I feel like adding the color really helped.
Red - They always need to ask the question
Yellow - If they answer yes they need to proceed with caution and follow the steps in the foldable
Green - Good to go on to the next step!
Second, I really liked how my pages on writing inequalities and solving from word problems went. Here's what it looked like:
I had the students choose four different colors to write with. Then we used each color to represent an inequality and take notes. In the middle of the foldable there were simple inequalities that they underlined the important phrase in the corresponding color (i.e. for my foldable, I would underline "is under" in blue and then right the corresponding inequality making sure I used a "less than" symbol)
I thought this went really well. Then the students worked on a worksheet where they used the same color-coding to identify what symbol to use.
What have you done recently to incorporate more interactive notes like highlighting, color, or underlining?
It's the Little Things
Why is it that the simplest of changes can make our daily routines so much easier and organized?
I've done two things this week that have really helped my work flow:
1. Reorganized my bookshelf. I moved my set of binders for a prep I'm not teaching to a cabinet, moved mine for my current shelf down one, and then created a go-to place for frequently need items. Now I can keep a tub of teacher supplies (markers, highlighters, glue, colored pencils) separated and within easy reach. Then I have my binders of parent contact and student info for each block (1st - red, 3rd - blue, 4th - yellow). This is followed by my binders of resources for my current units. Finally I have my new favorite resources ever, a binder of algebra resources I bought (post to come on that!). The bottom shelf has various binders of resources (problem solving, graphic organizer templates, lesson planning ideas/models, classroom management tips, etc.)

Before the move, many of these things were just sitting on a random part of my desk, or under a stack of papers. Now I feel like it is so easy to get what I need and return it to an exact place.
2. Took out all my plastic utensils from their cover and separated by type.

So...this may seem ridiculous, but I hate wasting any amount of time...thus, when we were having another snow day = work day last week, I took my disgusting, broken paper bag full of drive through utensils (donations thanks to the parents) still in plastic or - more typically - plastic with just the spoon and/or knife left after I used the fork...and organized! Now once I make my lunch all I have to do is grab what I need. No more torn paper bag. No more searching for a bag that has something besides a knife in it.
Hey, every minute counts!
What simple things have you found save time and energy?
I've done two things this week that have really helped my work flow:
1. Reorganized my bookshelf. I moved my set of binders for a prep I'm not teaching to a cabinet, moved mine for my current shelf down one, and then created a go-to place for frequently need items. Now I can keep a tub of teacher supplies (markers, highlighters, glue, colored pencils) separated and within easy reach. Then I have my binders of parent contact and student info for each block (1st - red, 3rd - blue, 4th - yellow). This is followed by my binders of resources for my current units. Finally I have my new favorite resources ever, a binder of algebra resources I bought (post to come on that!). The bottom shelf has various binders of resources (problem solving, graphic organizer templates, lesson planning ideas/models, classroom management tips, etc.)
Before the move, many of these things were just sitting on a random part of my desk, or under a stack of papers. Now I feel like it is so easy to get what I need and return it to an exact place.
2. Took out all my plastic utensils from their cover and separated by type.
So...this may seem ridiculous, but I hate wasting any amount of time...thus, when we were having another snow day = work day last week, I took my disgusting, broken paper bag full of drive through utensils (donations thanks to the parents) still in plastic or - more typically - plastic with just the spoon and/or knife left after I used the fork...and organized! Now once I make my lunch all I have to do is grab what I need. No more torn paper bag. No more searching for a bag that has something besides a knife in it.
Hey, every minute counts!
What simple things have you found save time and energy?
Tuesday, February 18, 2014
My Sanity Savers
Two of my favorite things I've fully implemented this year are my "Do Now" board and my entrance table. Both of these greatly help me to save time at the beginning of class, and during class, so I can spend as much time on instruction as possible.
As I said in an earlier post, I train students the first day to pick up a copy of everything that is laid out on my white table by the door.

This is an example of a day with a lot of paper. Usually they are picking up 2-3 pages.

Then they are supposed to read the board and do what it says...now (thus the name =P)

 Don't you love my beautiful handwriting? Sadly that is me trying a bit. Sometimes I'll also be projecting something for them to read/copy/consider.
These take a couple extra minutes to set up in the morning, but it makes everything else run more smoothly.
As I said in an earlier post, I train students the first day to pick up a copy of everything that is laid out on my white table by the door.
 |
| Close up of what I laid out yesterday |
This is an example of a day with a lot of paper. Usually they are picking up 2-3 pages.
Then they are supposed to read the board and do what it says...now (thus the name =P)
These take a couple extra minutes to set up in the morning, but it makes everything else run more smoothly.
Monday, February 17, 2014
Keeping track of it all - Daily To Do's
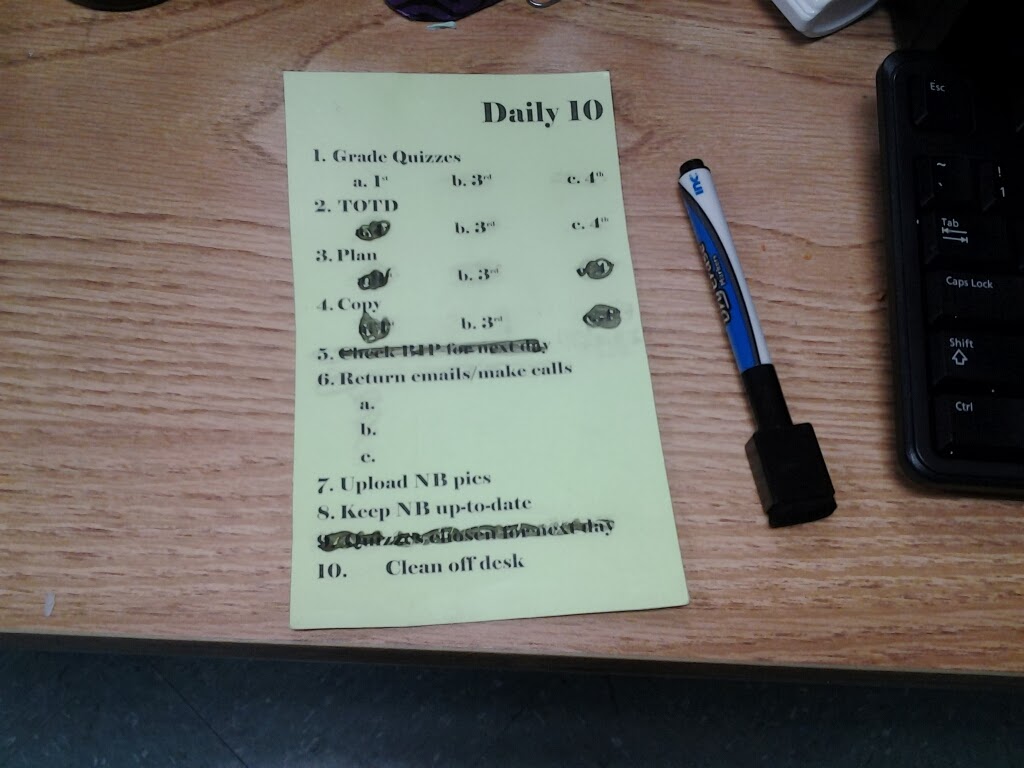
If you are any bit as type A as I am, then you probably write a ton of to do lists. I get a great sense of accomplishment from crossing things off. But, after a while I found I was writing the same thing every day...which seemed to lack efficiency. Plus there were things I should have been thinking of daily...but sometimes forgot. Thus, one planning period I whipped up this lovely time saver. I call it my Daily 10.
I printed it on card stock, laminated with some contact paper and had a handy little reminder to keep by my desk so my changing list of tasks isn't too cluttered.

PS - This is on beautiful lime green card stock =P. I don't know what is going on with my camera!
Update: Better picture with the to-do list in action!
Update: Better picture with the to-do list in action!
Making graphing practice more interesting
This weekend I worked on a nice little project that will hopefully encourage my students to practice their graphing. The idea is for students to use dice to fill in the blanks for slope and y intercept and then graph in their groups on dry erase boards. I just used a sharpie and notecards, then laminated with my lovely laminator (best thing ever). I added a strip of color to the side to keep the sets of cards separate.
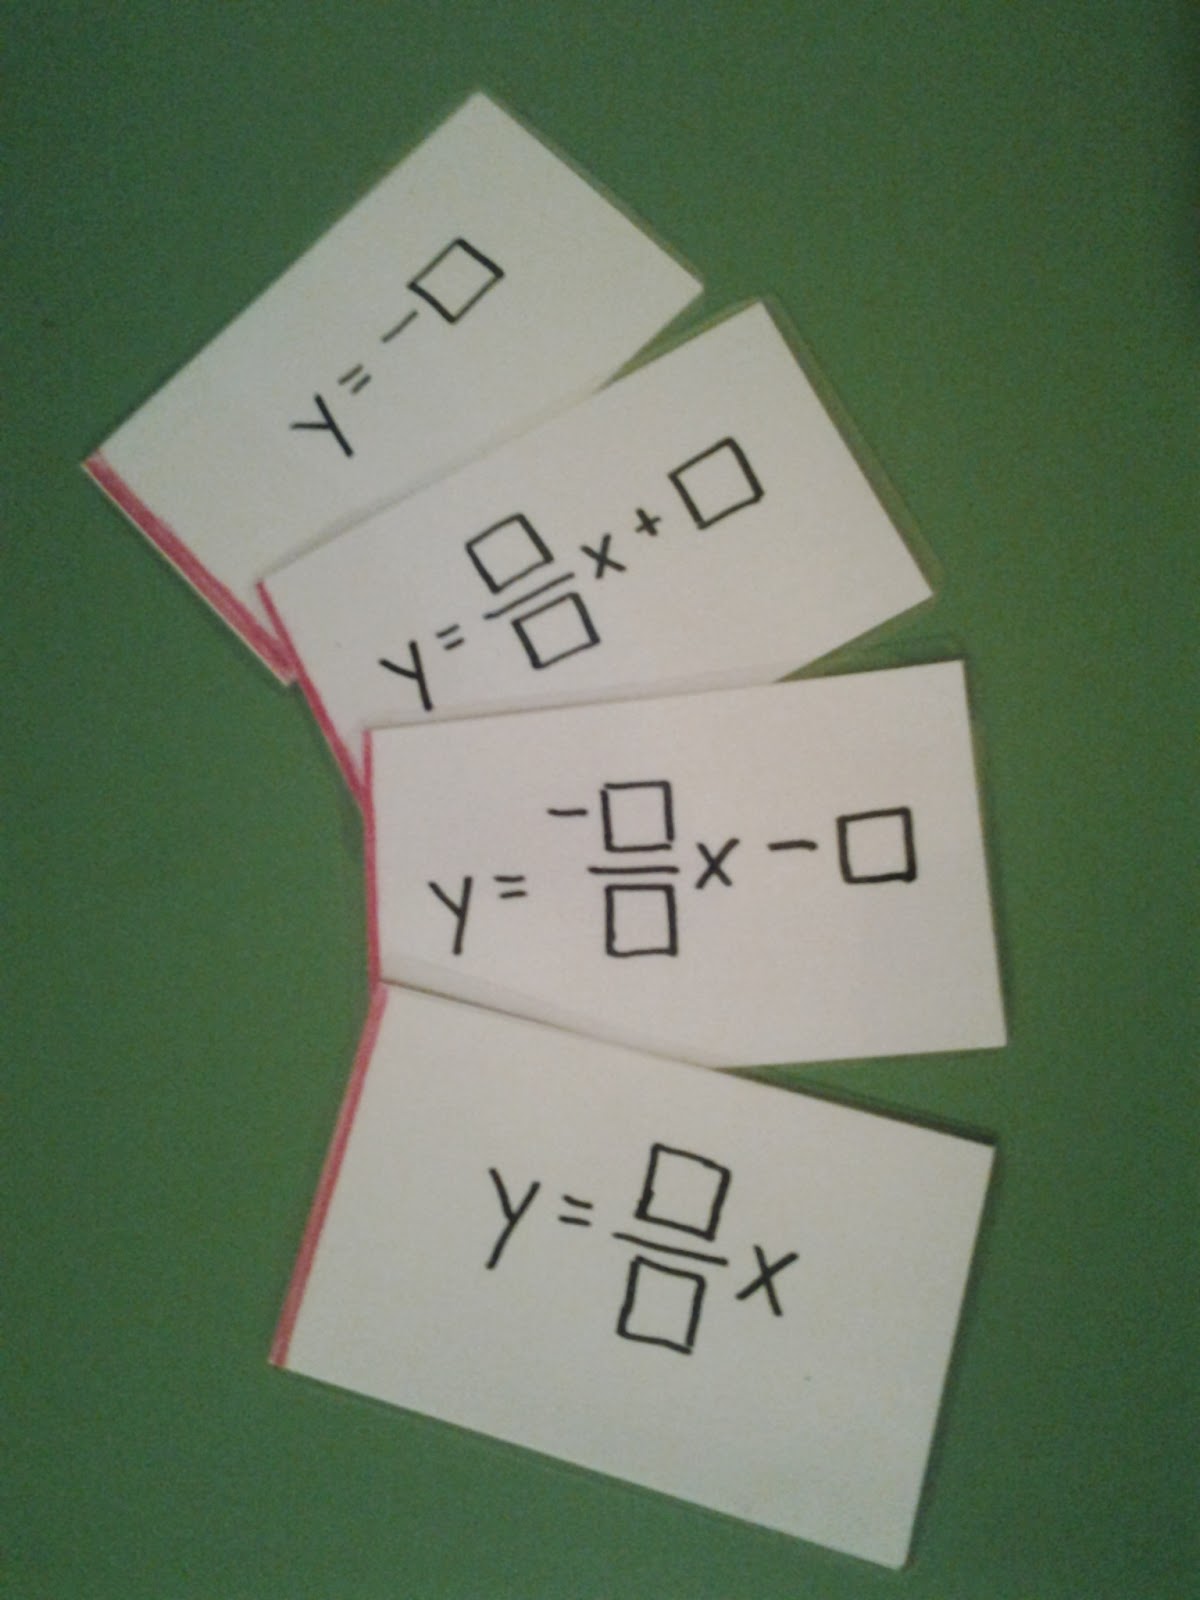


Happy graphing!
Factoring Game: Blend of block game/connect 4
First of all, let me say this activity is completely in debt to the great blogging world out there sharing there stuff.
Inspiration: Wanting a fun activity that gives students immediate feedback about being correct, with a little competitive atmosphere.
Topic: Factoring trinomials, a =1.
Background:
I've used Maria's block games frequently with great success. It is simply amazing to me how many more problems students will do in this format. Here is the link to her factoring block and exponent block games. I've used both of these, and she has others! I thought simple factoring would be an excellent way to adapt this game.
Enter: ilovemath.org's "Algebra Connect" game. The only thing I didn't like about the description was having a 3rd player as "ref". I wanted all students to be working and accountable, plus I made it for my lower level class and wanted everyone to get a lot of practice.
What do you know - the connect grid when cut up fits perfectly on the blank game board for the block game? All I had to do was write the answers on the back of the master, photocopy on card stock, and cut!
Notice I love the game boards so much I laminated.
How to Play (at least how we did)
1. Each player needs some sort of marker, I use the glass pebbles you see that I got at the Dollar Tree.
2. Player 1 rolls the two die, and goes to the column and row (4 - 5 would mean column 4 and row 5) and attempts the problem. They say their answer outloud and together with player 2, checks the answer. If they are right, they claim the spot. If they are wrong it stays blank.
3. Player 2 rolls and continues in the same way.
Goal: Can be whatever you choose - 4 in a row, most on the page.
I had some kids genuinely excited to play! And that's what counts =)
Thanks for stopping by! Link up with your own Monday Made it's
Inspiration: Wanting a fun activity that gives students immediate feedback about being correct, with a little competitive atmosphere.
Topic: Factoring trinomials, a =1.
Background:
I've used Maria's block games frequently with great success. It is simply amazing to me how many more problems students will do in this format. Here is the link to her factoring block and exponent block games. I've used both of these, and she has others! I thought simple factoring would be an excellent way to adapt this game.
Enter: ilovemath.org's "Algebra Connect" game. The only thing I didn't like about the description was having a 3rd player as "ref". I wanted all students to be working and accountable, plus I made it for my lower level class and wanted everyone to get a lot of practice.
What do you know - the connect grid when cut up fits perfectly on the blank game board for the block game? All I had to do was write the answers on the back of the master, photocopy on card stock, and cut!
 |
| Set up for the game |
 |
| Front of a piece |
 |
| Back of a piece |
 |
| 1st Move |
Notice I love the game boards so much I laminated.
How to Play (at least how we did)
1. Each player needs some sort of marker, I use the glass pebbles you see that I got at the Dollar Tree.
2. Player 1 rolls the two die, and goes to the column and row (4 - 5 would mean column 4 and row 5) and attempts the problem. They say their answer outloud and together with player 2, checks the answer. If they are right, they claim the spot. If they are wrong it stays blank.
3. Player 2 rolls and continues in the same way.
Goal: Can be whatever you choose - 4 in a row, most on the page.
I had some kids genuinely excited to play! And that's what counts =)
Thanks for stopping by! Link up with your own Monday Made it's
Friday, February 14, 2014
INB: Attaching Options
As far as I can tell, there are three main ways of attaching items to an interactive notebook:
1. Glue sticks
2. Tape
3. Liquid glue
Usually stapling is eliminated because it tends to rip pages. This is closely followed by liquid glue which is seen to be messy and wrinkles the page badly. In its unaltered form I would agree. But here are my problems...
1. Glue sticks - fine if they are on sale before school starts. But in my area I was only able to find them on sale (at what I consider a buy price - 25 cents for 4) ONE time in the summer. Total bummer, especially since my kids burn through them (or I guess, glue through them). I've found things are going a little better now that I actually duct taped the outside to indicate what group they belonged to. I think I'm also going to implement a "Don't throw away until you show to Mrs. Hester" for glue sticks and markers to ensure they really are in bad shape.
2. Tape is expensive. This is my default method of attachment. I am still working on teaching my darling 9th graders what an appropriate amount of tape is (1 piece, about 2 inches long) for one sheet of paper. Most of them are doing fine. I also started to encourage students to bring there own, which some of them will do.
Each group has their own tape dispenser.
This is why when I found the idea for a glue sponge I was in INB heaven.

First, liquid glue is always on sale before school. I think I probably got 20-30 bottles for about a dollar by the time school started. That amounts to many containers of glue plus refills.
Second, it is cheap, easy and if you play it up there are kids who would much rather use the glue sponge. (I started off last semester with one set per group, and have upped it to two per group because of demand).
Main uses:
Cut and paste activities where they use smaller pieces of paper
Supplies
1. Small containers from the Dollar Tree (or somewhere else cheap)
2. Sponges
3. Lots of liquid glue
Steps:
1. Cut sponge to size using scissors
2. Squirt glue in the bottom of the container
3. Place sponge on top.
4. Squirt glue on top of sponge. Cover
5. Let sit for a while (maybe 30 minutes - 1 hour)
6. Flip sponge over and repeat until sponge is thoroughly sticky.
I will take a few minutes every few weeks to reload the sponges with glue after school. Apparently you can also squirt a little water on them as well to spruce them up.
What are your ideas for using the glue sponge?
1. Glue sticks
2. Tape
3. Liquid glue
Usually stapling is eliminated because it tends to rip pages. This is closely followed by liquid glue which is seen to be messy and wrinkles the page badly. In its unaltered form I would agree. But here are my problems...
1. Glue sticks - fine if they are on sale before school starts. But in my area I was only able to find them on sale (at what I consider a buy price - 25 cents for 4) ONE time in the summer. Total bummer, especially since my kids burn through them (or I guess, glue through them). I've found things are going a little better now that I actually duct taped the outside to indicate what group they belonged to. I think I'm also going to implement a "Don't throw away until you show to Mrs. Hester" for glue sticks and markers to ensure they really are in bad shape.
2. Tape is expensive. This is my default method of attachment. I am still working on teaching my darling 9th graders what an appropriate amount of tape is (1 piece, about 2 inches long) for one sheet of paper. Most of them are doing fine. I also started to encourage students to bring there own, which some of them will do.
Each group has their own tape dispenser.
This is why when I found the idea for a glue sponge I was in INB heaven.
First, liquid glue is always on sale before school. I think I probably got 20-30 bottles for about a dollar by the time school started. That amounts to many containers of glue plus refills.
Second, it is cheap, easy and if you play it up there are kids who would much rather use the glue sponge. (I started off last semester with one set per group, and have upped it to two per group because of demand).
Main uses:
Cut and paste activities where they use smaller pieces of paper
Supplies
1. Small containers from the Dollar Tree (or somewhere else cheap)
2. Sponges
3. Lots of liquid glue
Steps:
1. Cut sponge to size using scissors
2. Squirt glue in the bottom of the container
3. Place sponge on top.
4. Squirt glue on top of sponge. Cover
5. Let sit for a while (maybe 30 minutes - 1 hour)
6. Flip sponge over and repeat until sponge is thoroughly sticky.
I will take a few minutes every few weeks to reload the sponges with glue after school. Apparently you can also squirt a little water on them as well to spruce them up.
What are your ideas for using the glue sponge?
Thursday, February 13, 2014
Making Interactive Notebooks Work
MY TOP 10 TO SUCCESSFUL INTERACTIVE NOTEBOOK IMPLEMENTATION
1. Start off day one with the notebooks.
This summer when Office Depot had composition notebooks for sale, I stocked up on enough for class sets for one semester (I'm on block). This way I can start off teaching expectations from the beginning and not have to wait for students to bring in one - especially since we all know there are a couple who will never bring one. On their supply list is a notebook to replace the one I gave them.

2. Page Numbers
Last semester I started putting the page number on copies. Changed...my...life. If you are tired of hearing "What page does this go on?" look no further. I put mine in a box in the top right corner.

Check out my post on my group supply bins and how to make them work. Then students have everything they need and aren't constantly searching for supplies. It also helps decrease movement, prep time, and holds students responsible.

4. Control Paper Distribution
I have a table when they enter where they pick up all their copies for the day. I will be writing a post later on how this works day to day. But, I instruct them on the first day to get the papers on the table as they come in and reinforce it for a couple days. After that it is on autopilot and we don't have to lose momentum in class to pass out materials.

I've started using Math = Love's Unit TOC's and I'm loving it. I've also put a place on the back to stamp for homework and classwork which is a new addition this semester. I made a TOC for the front bulletin board out of poster board, marker, and contact paper. I can write on it in Expo marker and erase when necessary.

This makes it so easy for students to use it as a reference, for you to do notebook checks on a particular section, or to find specific material more quickly.

7. Envelope for piece-y parts
Part of why you probably when to do an INB is to be more interactive, which often involves cutting and pasting. But we all know sometimes things happen and we don't get to an activity when we thought and all those pieces are lying about. We have an envelope at the front of the notebook that is the home for such things. I got mine at a supply warehouse our district keeps for teachers based on donations.

8. Embrace the pocket
I make pockets out of construction paper cut in half both ways. Students tape on bottom, right and left. These are great to put full size paper or packets that you just can't cut down. Or put in note cards with vocab, notes, etc.


9. Don't feel pressure to put everything in the notebook.
My students are required to have a binder where we keep quizzes, tests, and extra classwork in the classroom. I think this helps keep the notebook from being cluttered and last semester I used almost my entire notebook for the course even with keeping classwork separate.
10. Have students prep before class starts
I feel crazy for saying this but...I don't do traditional warm-ups. Students have five minutes at the beginning of class to do a "Do Now" that involves turning in homework and getting materials ready for the day. At the start of a new unit they might be putting on the new tab, they might be cutting out pieces for an activity, folding and cutting some guided notes - it depends on the day. I put the instructions in a dedicated part of the board with an example of what I want done.
I hope some of these encourage you to try something new! Feel free to leave your own tips for INB success as well. Always remember to take it a step at a time. This is my third semester doing notebooks and it is finally going much more smoothly, but it took a lot of trial and error - just stick with it!
Finally: A Homework Routine that Works for Me!
I feel like homework grading and collection is the bane of most math teachers' existence. I think I have finally done some things to make the whole process much better.


Background - aka "The Old Way"
-Homework assigned every night
-I would go around and stamp the actual NB page while students worked on something else. If I felt rushed I would say I would check it later in class, sometimes I did, sometimes I didn't.
-I accepted late homework at a unit test. I would take up NB and regrade as they took their test.
-Since I accepted late homework, I just asked for homework questions and didn't project solutions
-It was hard for students to visualize how their homework grade was progressing.
"The New Way"
-Students turn in their homework to a tray on my desk with their TOC attached. On the back of the TOC I have blanks for homework and classwork.
-While they do their daily quiz I stamp their TOC page and might even write a note like "Solve" if they just set up questions or "Work?". I have one stamp for full credit (blue) and one for half (red)
-I don't accept late homework anymore.
-I go over the homework and project the solutions. Students are supposed to correct them daily and I check at the unit test. Still working on making that go smoothly. But, I hope it will help some students see their answers/work is completely wrong (I feel like before I would have some clueless souls who didn't realize this until a test)
*When not in the process of being graded, their current TOC and homework for the night lives in a pocket we created in the front of the notebook*
I feel like this one thing has helped so much in establishing norms in my classroom and making all of our lives a lot more transparent.
Now instead of collecting notebooks to record homework/classwork grades, I collect just their TOC on Fridays to add up the points for the week and record.
What have you found works for you?
Classroom Tour
Welcome to my home away from home!

Front wall:
Place for "I can" statement, HW, and current vocab for each class. I used black electrical tape to separate the sections. I've found it holds up very well over a semester.


Above the board is a poster set of Bloom's Taxonomy I found on TeachersPayTeachers.

Under the board: "Motivational" Posters I got mostly from Pinterest.


My Back Wall:
Problem solving and SMP wall:

Organized by unit. I got the sentence strip holders from the dollar bin at Target before school started.
"Pi -i -e" painting done by yours truly.


Calculator Storage

Student Extra Supply storage, complete with humorous math photos on the front:


Subscribe to:
Posts (Atom)